Rendering videos can be a complicated process. How can you squeeze the most quality out of your footage? How can you make sure your video looks great on Youtube?
The reality is, it’s actually quite a simple process to render videos using DaVinci Resolve, and I’m going to show you the best DaVinci Resolve render settings in this guide.
By the way, here is a video rendered using these settings if you’re curious.
Before you start
Firstly, you need to make sure that the raw footage you’re using is of high quality. If you’re shooting a video with a DSLR camera for example, you should ideally be recording in 1080p (or 4K if possible) with a high bit-rate.
I can recommend the Sony a7 III Mirrorless camera if you want to record high-quality 4K footage.
If you’re making a gaming video, you should record your gameplay in the highest possible quality and at 60 frames per second (FPS) if possible. You can use free software like OBS to do this.
The reason having high-quality raw footage is important is that it’s impossible to improve the quality of a video once it’s been recorded. There’s no magic “setting” or technique to make blurry footage clearer, or increase detail (although you may be able to make some minor fixes here and there).
There’s also no way to increase the FPS of a video. For example, most gaming videos are recorded and rendered at 60 FPS, so if your gameplay was recorded at 30 FPS, you are locked to that frame rate.
When editing, I also recommend using a 4K computer monitor with decent color accuracy. This will allow you to edit and view your video in native 4K resolution (if you’re recording in 4K) and ensure colors are correct. I made a list of the best budget 4K monitors that you can check out (I use the LG 27UN850-W).
Best DaVinci Resolve render settings
Once you’ve sourced your high-quality footage, and edited your video, it’s time to render. Pro tip, if you’re planning to add chapters in your YouTube video, you can specify these within DaVinci Resolve before rendering.
I also strongly recommend purchasing the Studio version of DaVinci Resolve if you’re doing to be regularly editing within Resolve. The free version works fine, but you unlock several powerful features with the Studio version.
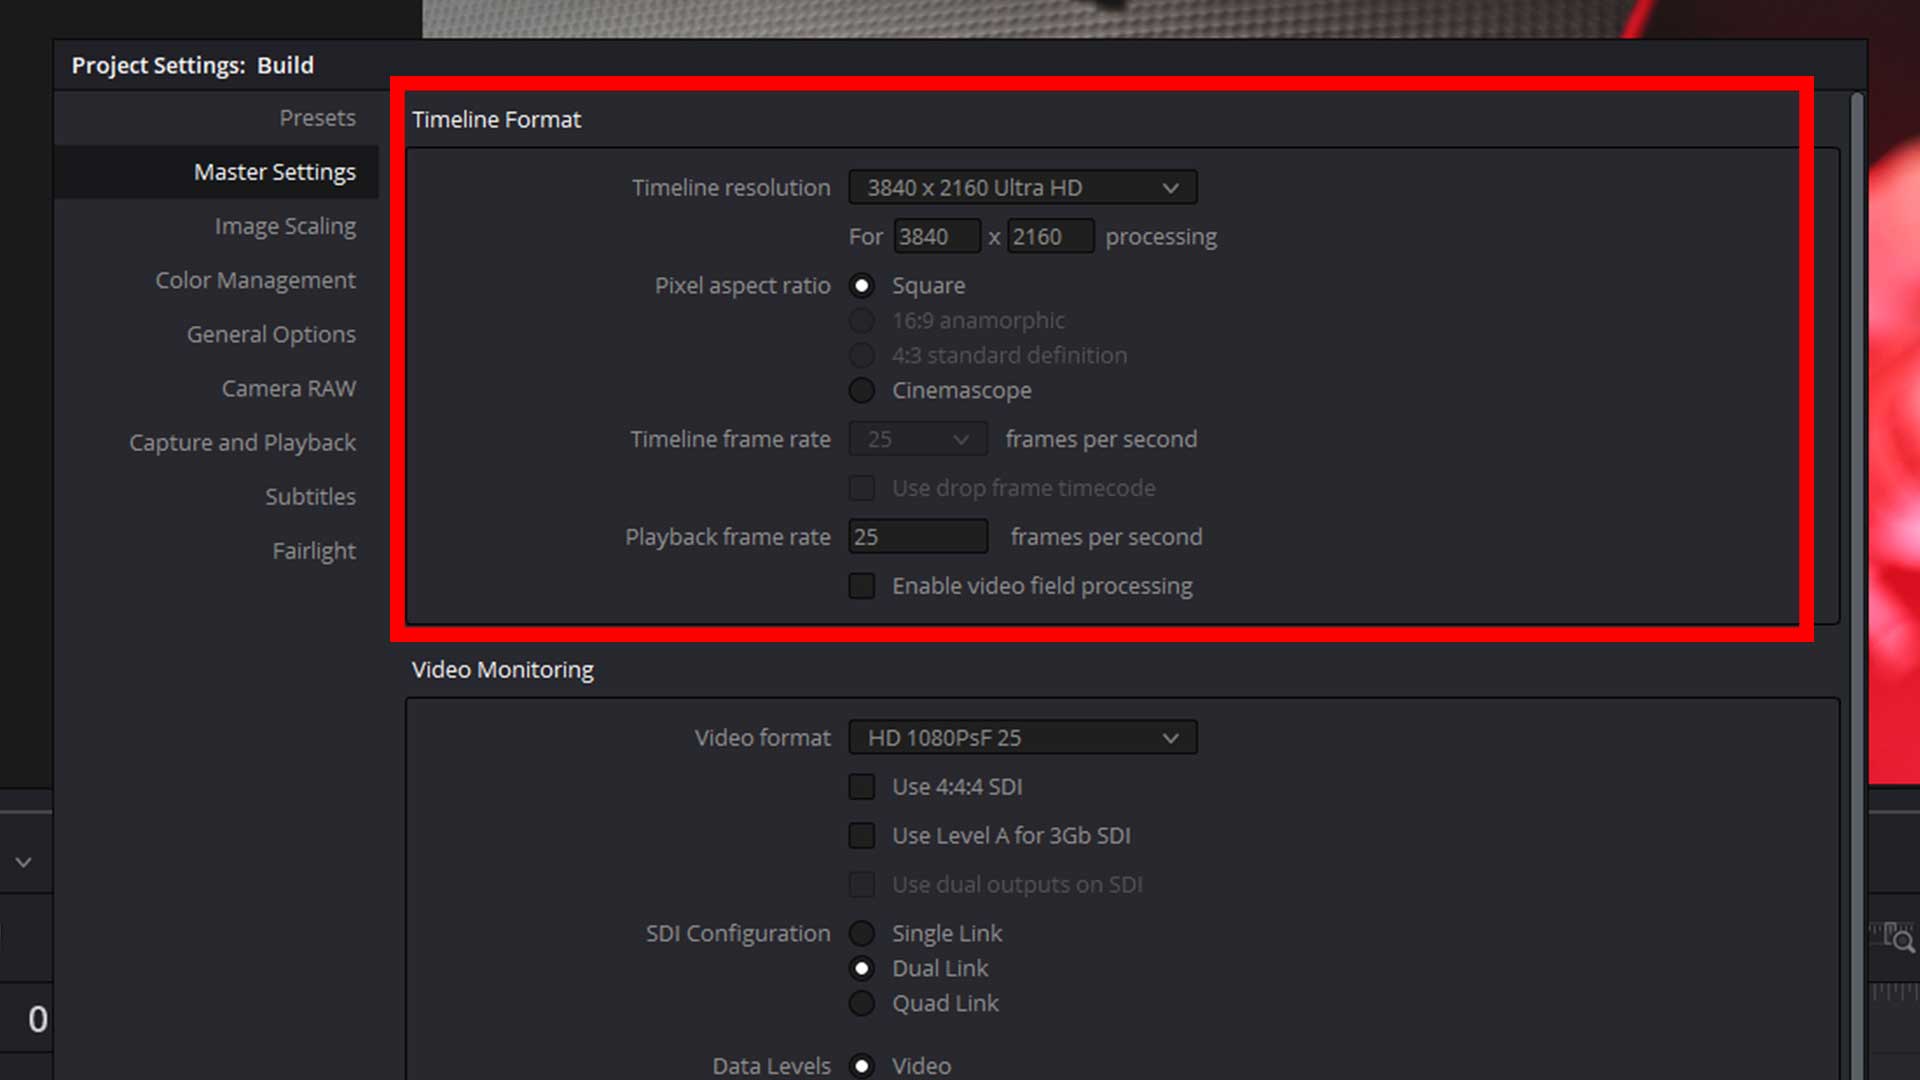
Now, just before you go into the render tab on Resolve, click on the little gear icon in the bottom right corner of the screen.

This will open the Project Settings, where you’ll want to ensure that the timeline resolution is set to 1920 x 1080 (for 1080p), or 3840 x 2160 (for 4K). If you’re not sure which resolution to choose, it’s best to match the resolution the footage was recorded in. For example, if your footage was shot in native 4K, you should render at 4K.
If you’ve recorded the footage at a higher resolution, it’s also fine to downscale/decrease resolution (e.g. you can render at 1080p if the footage is 4K). However, it’s never a good idea to upscale/increase resolution (e.g. rendering 1080p footage in 4K) as this will make your final video blurry when watched in the largest resolution.
This is also the same principle with frame rate. You can render the final video in a slower frame rate than your original footage, but you should never render in a higher frame rate. For example, rendering original 60 FPS footage in 30 FPS for your final video is fine, but trying to “increase” from 30 FPS to 60 FPS is not.
You will want to make sure that the Timeline frame rate is accurate here. The footage in this example was recorded on a DSLR at 25 FPS, so 25 FPS is also selected in Resolve.
Next, click on the little rocket icon in the bottom center of the screen. This will open the Render Settings page. You’ll be able to see that Resolve has it’s own Youtube render preset. You’re not going to use this as you can squeeze more quality out by tweaking the settings further. So, select “Custom” for your Render preset, and use the following render settings:
Render: Select “Single clip”. I only use the “Individual clips” option when I want to trim several clips of raw footage into smaller ones to be used later.
Format: MP4
Codec: H.264
Resolution: The highest resolution you want your footage to be played in. If your footage is 4K, select 4K here as well.
Frame rate: This should match your video. Remember it’s ok to reduce the frame rate, but never increase it beyond what the footage was recorded in.
Quality: Select the Automatic setting, and choose the Best option.
Encoding profile: High
Key frames: High
Advanced Settings: You can simply leave these as the default settings. There is no need to change them.

Pro tip – you can save this Render Preset and use it for your next video. In the top right hand corner of the Render Settings window, you will see three little dots. If you click these dots, it will give you the option to name and save the settings you’ve just entered.
For the best audio quality, I recommend using the AAC audio codec with a constant bitrate. Don’t forget, you can also export audio separately.
That’s it! You’ve now selected the best possible render settings for your video. Click the “Add to Render Queue” button and begin rendering your video.
You can also use DaVinci Resolve to render YouTube Shorts and TikTok videos.
I also recommend learning these essential DaVinci Resolve shortcuts to help speed up your workflow.
Best DaVinci Resolve Render Settings FAQ
Is DaVinci Resolve the best editing program?
It’s one of the best programs you can use to edit videos. In fact, many Hollywood films are even edited using DaVinci Resolve. It’s also free to use, unlike Premiere Pro which involves a costly monthly subscription.
Should I render my video in 1080p or 4K?
Firstly, this depends what resolution the source footage was recorded in. It’s usually best practice to render in the same resolution. However, if you want to produce a smaller, easier to stream or download file with reduced quality, consider down-scaling to a smaller resolution (e.g. render 4K source footage to a 1080p final file).
Should I render my video in .mp4?
This depends what you want to do with the video. If you’re uploading to YouTube .mp4 is a good format to use.
What video codec should I render my video in?
H.264 is the most common codec. There’s also H.265 which is slightly newer, and AV1 – which is quickly increasing in popularity. However, I would recommend stucking with H.264 for now. It’s widely compatible and is great for YouTube videos.
What are the best 4K export settings for YouTube?
Most YouTube videos are uploaded using the .mp4 container with H.264 as the codec. You can select these options using the export settings in your chosen video editing software.
What is the best bitrate for 1080p 60FPS YouTube videos?
The best bitrate to select for 1080P 60FPS YouTube videos is the same bitrate the source footage was recorded in. In the DaVinci Resolve export video settings you can access this option and edit it.