If you’re experiencing slow and choppy playback in DaVinci Resolve, you should probably use proxies.
By utilizing proxies, you can enhance your editing experience, save time, and improve your workflow.
In this step-by-step tutorial, I will show you how to create, use, and manages proxy files to achieve smooth playback in DaVinci Resolve.
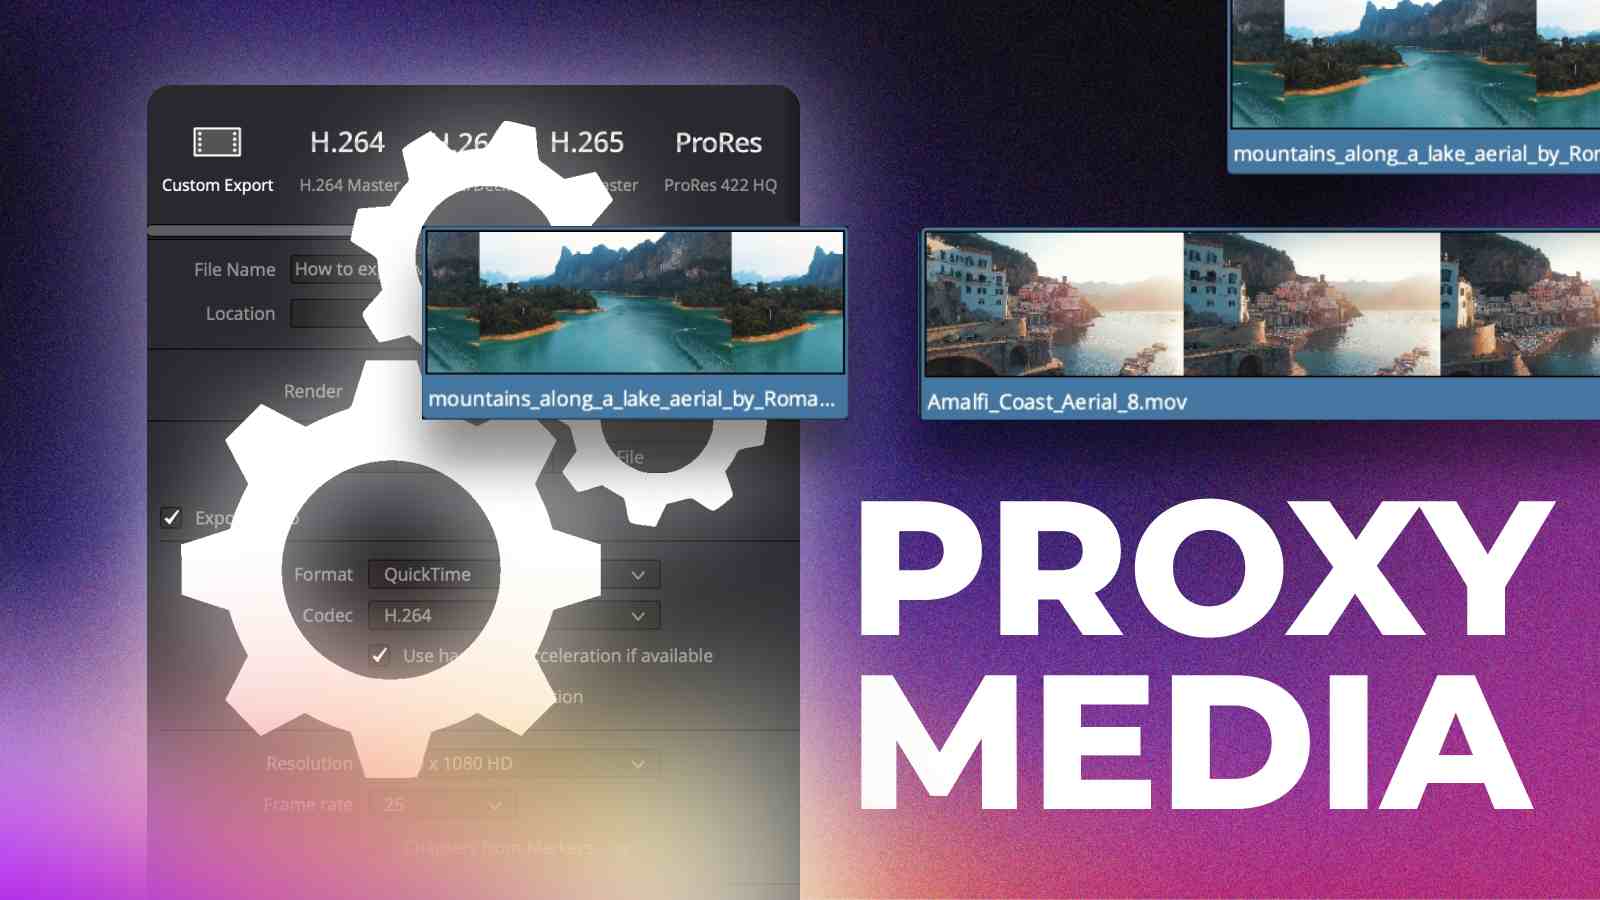
What is Proxy Media?
Proxy media is a lower-resolution version of the original video file that is easier to edit and allows for faster and smoother playback. Proxies are generally visually inferior to the original footage but can be easily toggled on and off to view the clips at full quality and resolution while editing.
Why Should You Use Proxy Media?
Proxies are particularly useful if your computer is not powerful enough to handle the footage you are trying to edit. For example – if you have very high-quality 8K raw footage, anything other than the most powerful computer system will struggle during the editing process.
Proxies “swap” these demanding original footage files with lower-quality files that visually look similar, but are much easier for your computer to handle.
Then, when you’re ready to render the final project, you can instruct DaVinci Resolve to render using the original footage.
Step 1: Choose Proxy Media Resolution
Go to “File” and select “Project Settings”.
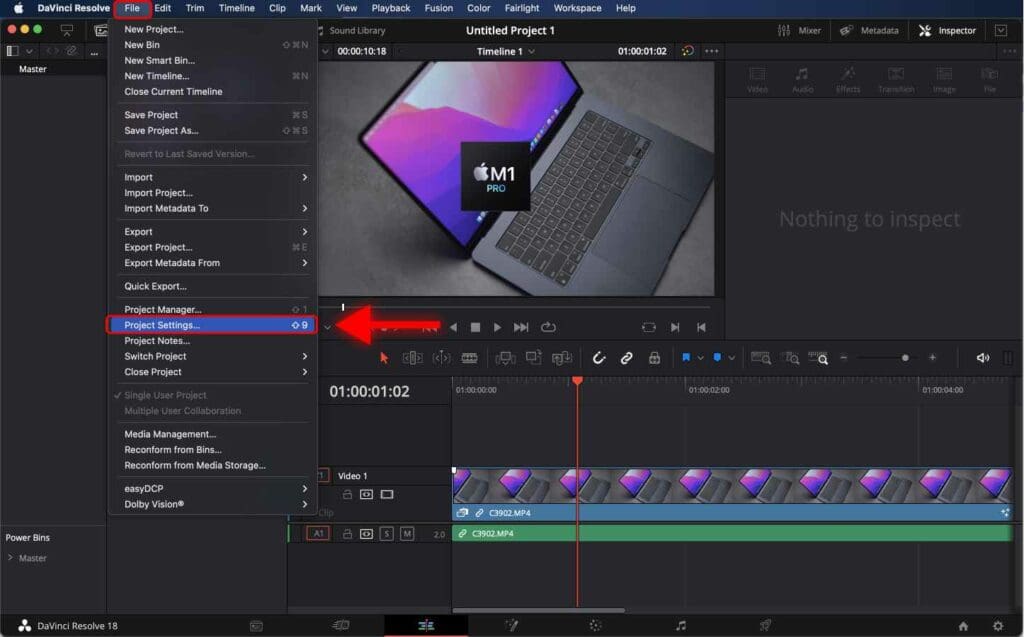
Alternatively, you can use the shortcut “Shift + 9” to open Project Settings.
To learn some of the most frequently used DaVinci Resolve shortcuts for macOS and Windows, check out 70 Easy DaVinci Resolve Shortcuts You Can’t Afford to Miss.
Go to the “Master Settings” tab.
Find the “Optimized Media and Render Cache” section.
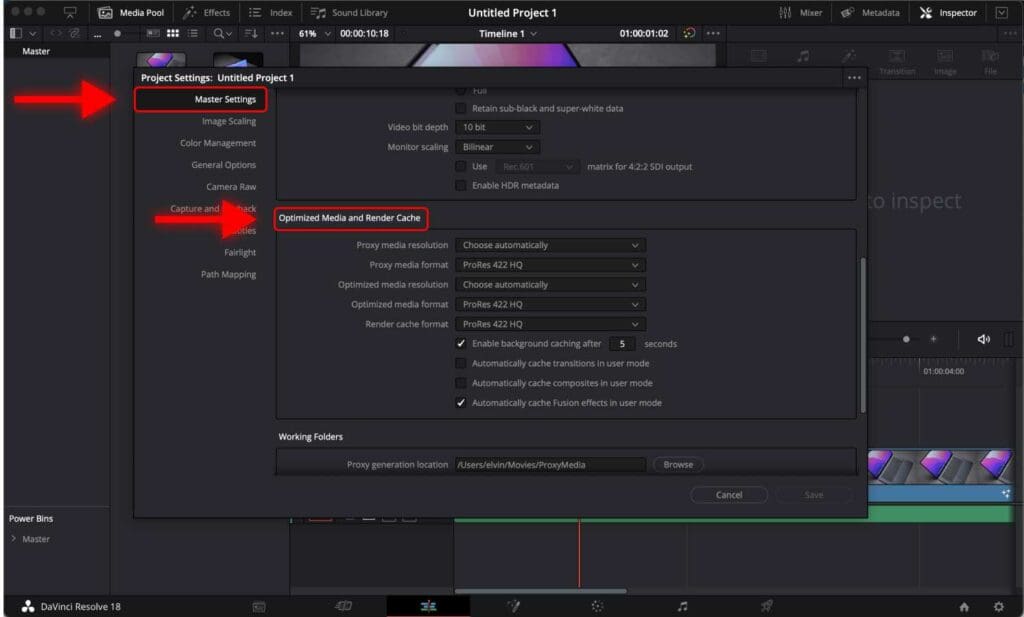
It’s time to choose the Proxy Media Resolution.
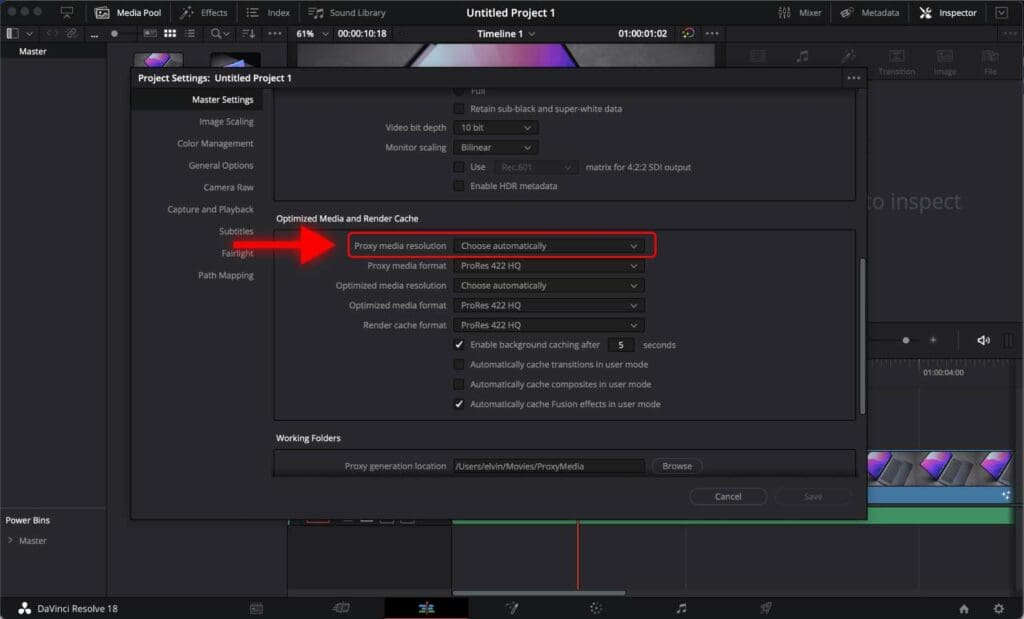
“Proxy media resolution” refers to the dimensions of the lower-resolution versions of the original media files. The resolution of proxy media is generally lower than the original media files, making them easier to edit and play on low-spec systems.
You are given the following options:
- Original
- Half
- Quarter
- One-Eight
- One-Sixteenth
- Choose Automatically
If you select “Choose Automatically”, DaVinci Resolve will look at the resolution of your original media and will decide how much it should drop the resolution.
I recommend you choose either “Half” or “Quarter” proxy media resolution.
Step 2: Choose Proxy Media Format
When creating proxies in DaVinci Resolve, you have the option to choose the resolution and format of your proxy media. The proxy media format determines the quality and file type of the generated proxy files.

The choice of media format (video codec) for proxy files may vary depending on your computer’s operating system.
ProRes is usually considered macOS friendly, and Avid DNxHD is more suitable for Windows, although both formats can be used on either operating system.
It’s generally preferable to choose the format that matches the operating system you or your team most frequently use.
Available proxy media formats are listed in the table below, from the highest quality proxy media file format to the lowest quality.
| Quality | macOS Friendly | Windows Friendly |
|---|---|---|
| Highest | ProRes 4444 XQ | DNxHR 444 |
| ProRes 4444 | DNxHQX | |
| ProRes 422 HQ | DNxHQ | |
| ProRes 422 | DNxSQ | |
| ProRes 422 LT | DNxLB | |
| Lowest | ProRes 422 Proxy |
The question is: which option should you choose?
Lower options provide the smallest file and lowest resolution. Meanwhile, higher options create big files with higher resolution suitable for color grading.
The choice of proxy media format depends on the following factors:
It is important to select a format that strikes a balance between file size and quality.
Below is the table with my preferred proxy media settings depending on the video project I’m working on.
| Project Resolution | Proxy Media Resolution | Proxy Media Format |
|---|---|---|
| 4K | Quarter | ProRes 422 Proxy |
| 1080p | Choose Automatically | ProRes 422 Proxy |
Step 3: How to Choose Proxy Generation Location (Optional)
Go to “File” and select “Project Settings”.
In the “Master Settings” tab, find the “Working Folders” section.
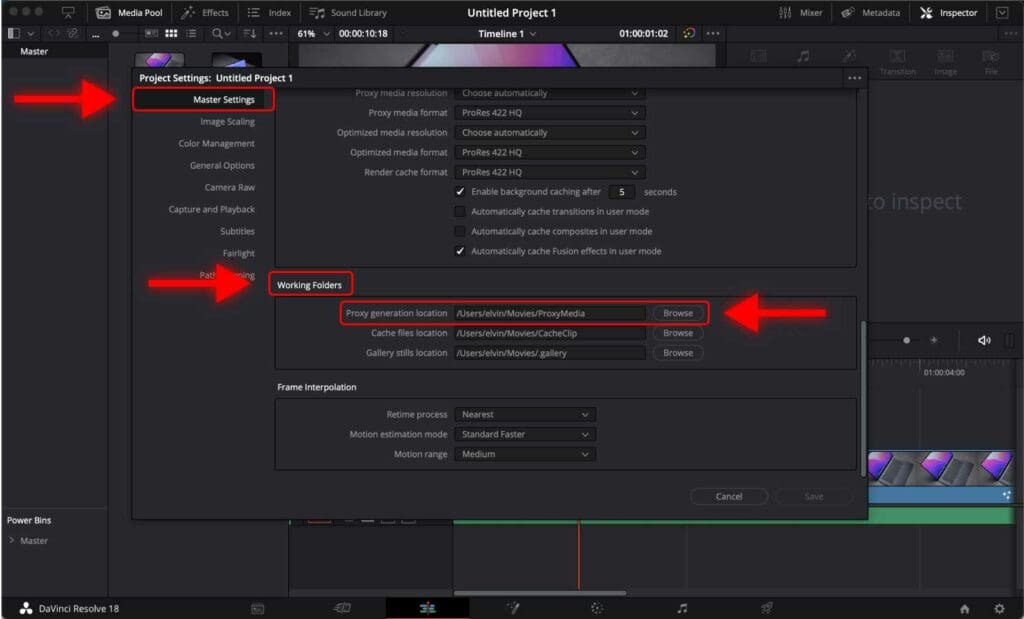
Next to “Proxy Generation Location”, there is a path to the folder that will store the proxy files for this project. You can change the location by clicking “Browse” and choosing a different folder. I usually save proxy files to the default location.
Step 4: How to Create Proxy Media
Select the clips that you want to create proxies for, right-click and select “Generate Proxy Media…”.
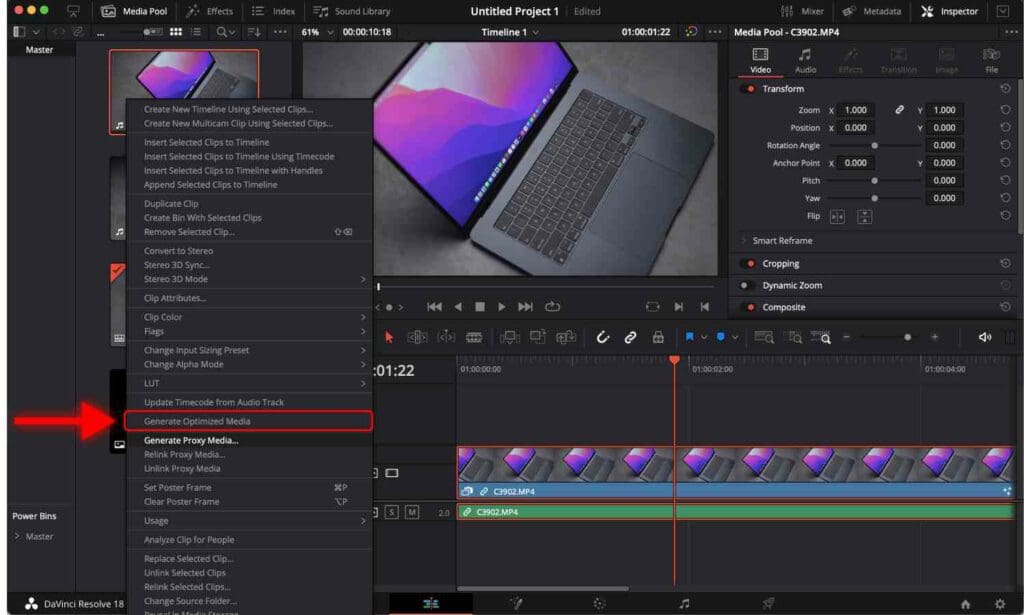
It can take a while to generate proxies, especially if the clips are very long.
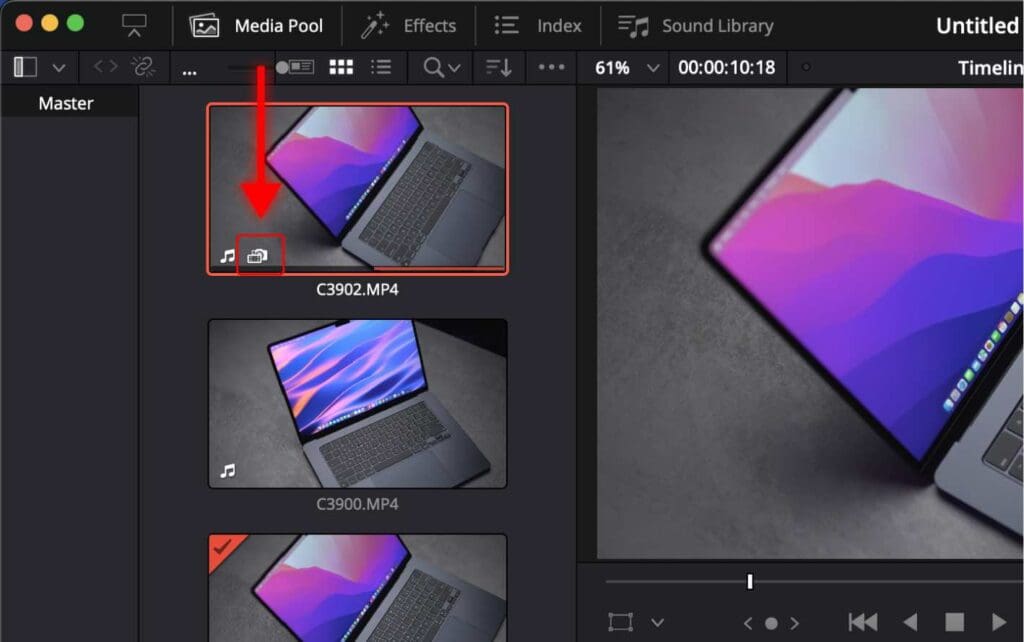
Once the proxies are created, a small icon will appear on the bottom left corner of a media clip. It indicates that the clip has a proxy media.
Then it’s time to make sure proxies are enabled.
Go to “Playback”, “Proxy Handling” and check “Prefer Proxies”.

If you are looking for more ways to achieve a smooth playback, you can learn How to Optimize DaVinci Resolve for Smooth Playback in 1 Minute.
Step 5: Managing Proxies
How to Disable and Enable Proxy Media
In case you need to see the original clip while editing, go to “Playback”, “Proxy Handling” and check “Prefer Camera Originals”.
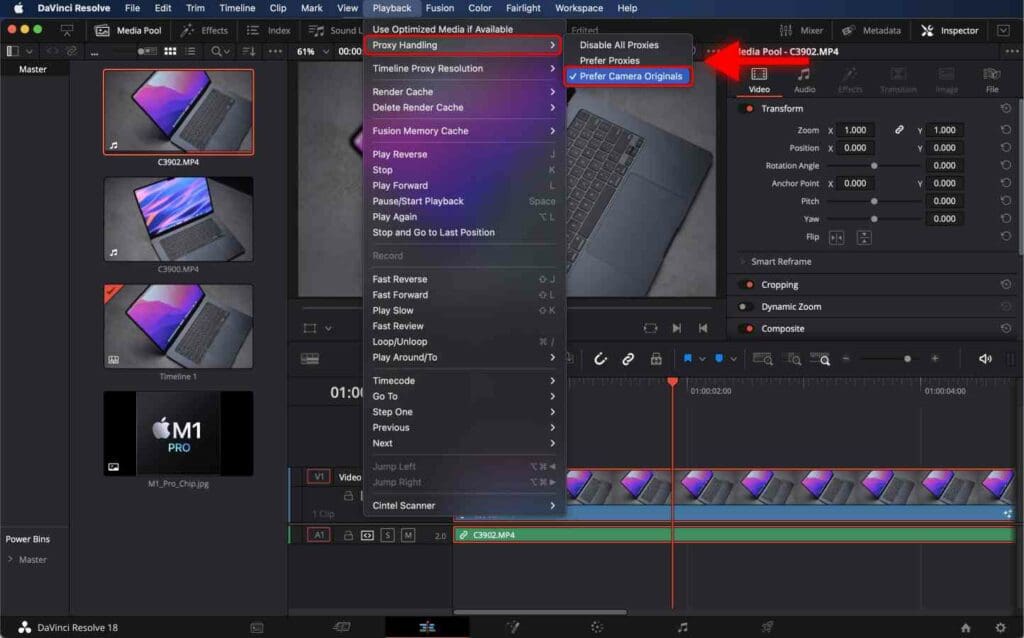
When you want to enable proxies, go to “Playback”, “Proxy Handling” and check “Prefer Proxies”.
How to Render Using Proxy Media
IMPORTANT
When you finish editing and are ready to render the video, disabling proxies is unnecessary. DaVinci will automatically use original media while rendering.
But if you want to make a low-quality render, you can use proxy media while rendering.
Go to the Deliver page, scroll down to “Advanced Settings“, and check “Use Proxy Media”.
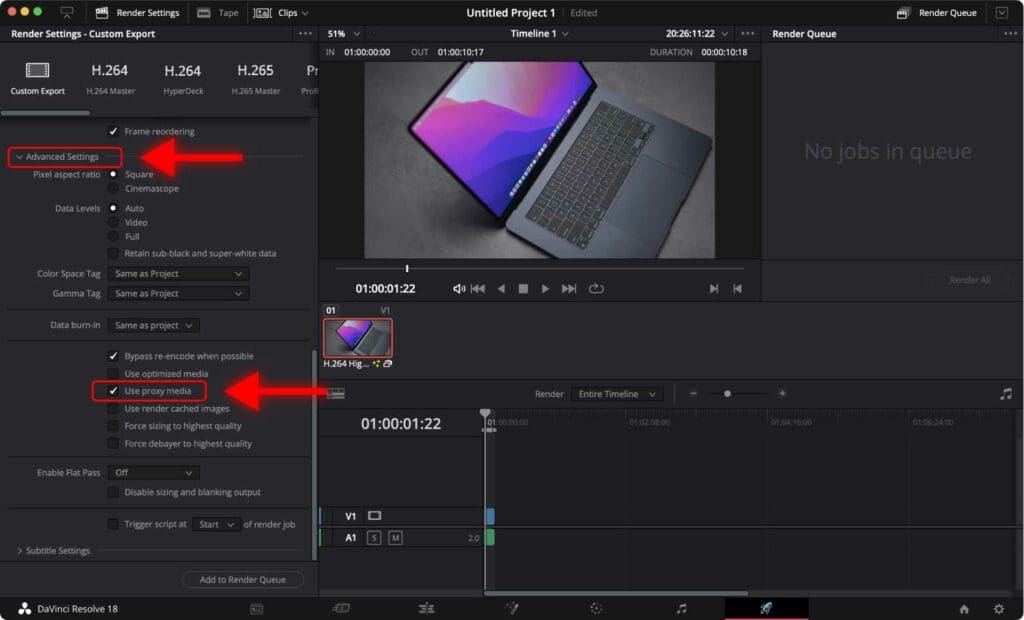
Resolve will then render a low-quality video using only proxy files.
How to Delete Proxy Media
Step 1: Go to “File” and select “Project Settings”.
Step 2: In the “Master Settings” tab, find the “Working Folders” section.
Step 3: Next to “Proxy Generation Location,” there is a path to the folder that stores the proxy files for this project. Click “Browse” to open the folder.

Step 4: Locate the folder named after your project in the media storage location.

Step 5: Right-click on the folder and select “Delete” from the context menu.
Confirm the deletion by clicking “Yes” in the confirmation dialog box.
Following these steps, you can delete the proxy media files for a specific project in DaVinci Resolve.
Before starting the render, check out the 2 Best Ways to Export Videos in DaVinci Resolve.
And if you are looking for more ways to speed up your editing workflow, make sure to check out How I Improve My Editing Workflow in DaVinci Resolve Using Power Bins.
Frequently Asked Questions
I created Proxy media, but I’m still experiencing slow playback. What should I do?
Check if you have enabled the option to use proxy media. Go to “Playback” and check “Use Proxy Media if Available”.
Remember that proxies are applied only to the video clips on the timeline. Adding additional Fusion effects, text, and color grading can slow down the playback.
To make the playback smoother, you can lower the timeline resolution.
Go to “Playback”, “Timeline Resolution” and select “Half” or “Quarter”. This will drop the resolution of the timeline. It will not affect the final render video as DaVinci Resolve will use original files during the render.
The proxy creation process is taking a long time. Is there a way to speed it up?
Proxy creation time can vary depending on the size and number of video files. You can try optimizing your workflow by creating proxies only for specific clips or using a faster computer or storage solution.
How can I delete proxies after I’m done with my project?
Step 1: Go to “File” and select “Project Settings”.
Step 2: In the “Master Settings” tab, find the “Working Folders” section.
Step 3: Next to “Proxy Generation Location,” there is a path to the folder that stores the proxy files for this project. Click “Browse” to open the folder.
Step 4: Locate the folder named after your project in the media storage location.
Step 5: Right-click on the folder and select “Delete” from the context menu.
Confirm the deletion by clicking “Yes” in the confirmation dialog box.
Following these steps, you can delete the proxy media files for a specific project in DaVinci Resolve.
ProRes or DNxHD?
Both video codecs are very similar in terms of quality and file size. ProRes is usually considered more “macOS friendly”, whereas DNxHD is more “Windows friendly”. However, both formats can be used on either operating system.
It’s generally preferable to choose the format that matches the operating system you or your team most frequently use.


